A small, heavy box arrived at the desk. Inside: an NVIDIA Jetson AGX Thor Developer Kit. No monitor. No keyboard. No display port handy. The task: flash JetPack 7.0, configure it headlessly from macOS, and get Docker and Tailscale running. Simple enough on paper.
It turns out there is one non-obvious failure mode that is not well documented. The OOBE wizard — the first-boot configuration screen — does not appear on the serial port you expect. NVIDIA’s own forum has a thread about it. After hitting the same wall, we worked through the workaround. This post is the reference we wish had existed.
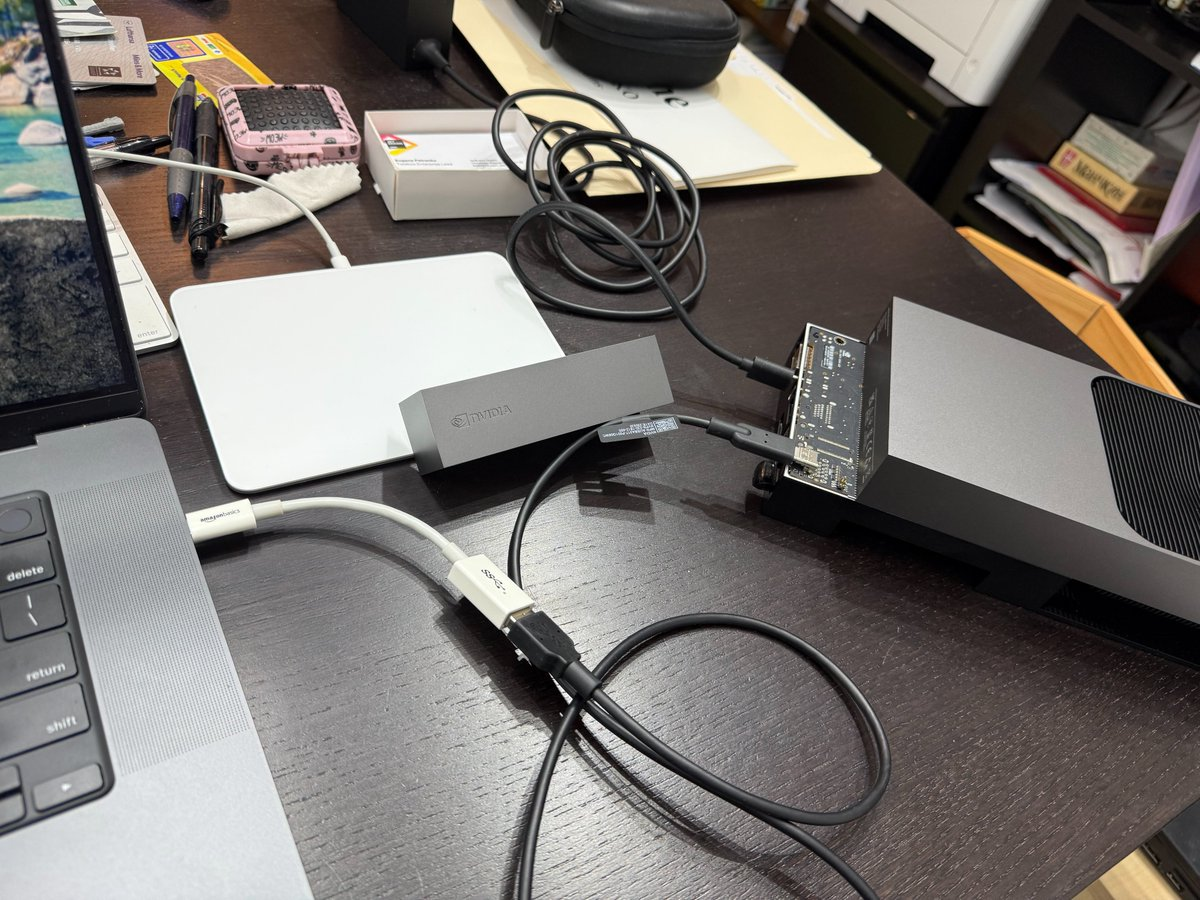
The Hardware
The Jetson AGX Thor Developer Kit carries the T5000 SoM with a Blackwell GPU — the same architecture as the DGX Spark (GB10). The core specs that matter for AI workloads are strikingly close between the two boxes:
| Component | Jetson AGX Thor (T5000) | DGX Spark (GB10) |
|---|---|---|
| GPU architecture | Blackwell | Grace Blackwell |
| Unified memory | 128 GB LPDDR5x | 128 GB LPDDR5x |
| Memory bandwidth | 276 GB/s | 273 GB/s |
| AI performance | 1,035 TOPS (FP8) | 1,000 TOPS |
| CPU | 14-core Arm Neoverse | 20-core Arm (Cortex-X925/A725) |
| Power | 40–130 W | ~60 W |
| Price | $3,499 | $4,699 |
| Primary target | Edge / robotics / physical AI | Desktop LLM inference |
The 128 GB unified memory is the number that matters most for LLM inference — it determines the maximum model size you can load. Both boxes hold the same amount, so they can run similarly-sized models. Compute performance is also in the same range.
Where they differ: the DGX Spark has a stronger CPU subsystem and its software stack (JetPack included) is more tuned for large model serving out of the box. The Thor is built for edge deployment — robotics, physical AI, sensor pipelines — with different peripherals (GPIO, camera inputs, QSFP28 networking) and a wider power envelope (up to 130 W peak, as low as 40 W idle). Think of the Spark as a desktop inference server; the Thor as a compute node that ships inside a robot or a rack at the edge.
For our purposes — running inference workloads on a local GPU node — the Thor is a perfectly capable alternative to the Spark, and at $1,200 less.
After the software setup below, the Thor we configured looks like this:
| Component | Detail |
|---|---|
| Device | NVIDIA Jetson AGX Thor Developer Kit (T5000 SoM) |
| OS | Ubuntu 24.04.3 LTS |
| Kernel | 6.8.12-tegra |
| Jetson Linux (L4T) | R38, REVISION 4.0 |
| NVIDIA Driver | 580.00 |
| CUDA | 13.0 |
The I/O side of the board has a row of ports. From left to right (roughly): two USB-A 3.2 ports, USB-C 5a (recovery mode, PD Sink 140W), USB-C 5b (data, PD Sink 140W), DisplayPort, HDMI, an RJ45 at 5 Gbps, and a QSFP28 quad-port at 25 Gbps each. Behind the magnetic lid cover on the top of the device: the Debug-USB port, the one with the serial console.
That lid cover is where the setup begins.
Prerequisites
- USB flash drive, 16 GB or larger (we used a 61.5 GB SanDisk)
- Mac with ≥25 GB free storage
- USB-C cable (one is enough)
picocominstalled:brew install picocom- The JetPack ISO (3.9 GB download, see below)
Step 1: Download the ISO
curl -L -o jetson-thor-r38.4.iso \
  "https://developer.nvidia.com/downloads/embedded/L4T/r38_Release_v4.0/release/jetsoninstaller-r38.4.0-2025-12-30-17-00-37-arm64.iso"
# 3.9 GB, 4,207,276,032 bytes
The ISO is on NVIDIA’s JetPack downloads page.
Step 2: Write the ISO to USB (macOS)
diskutil list external  # find your USB drive, e.g. /dev/disk4
diskutil unmountDisk /dev/disk4
sudo dd if=jetson-thor-r38.4.iso of=/dev/rdisk4 bs=4m
diskutil eject /dev/disk4
We wrote 4,207,276,032 bytes in 45.7 seconds (~92 MB/s). After dd completes, macOS will
show a dialog: “The disk you inserted was not readable.” Click Eject or Ignore —
the Jetson ISO9660 filesystem is not macOS-compatible by design. The USB stick is fine.
Step 3: Connect the Serial Console
Open the magnetic lid cover on the top of the Thor (see the picture above). Connect a USB-C cable from your Mac to the Debug-USB port inside.
macOS exposes four serial devices for this port. Different boot stages use different ones:
| macOS device suffix | Boot stage | Notes |
|---|---|---|
/dev/cu.usbmodem…B4 |
UEFI / GRUB menu | This is the interactive one |
/dev/cu.usbmodem…B2 |
Kernel dmesg | Useful to watch progress |
/dev/cu.usbmodem…B? |
Other subsystems | Usually quiet during install |
Open two terminal tabs:
# Tab 1 — GRUB and UEFI interaction
picocom -b 115200 /dev/cu.usbmodemTOPOA735A12B4

# Tab 2 — kernel messages
picocom -b 115200 /dev/cu.usbmodemTOPOA735A12B2
Your device names will differ from ours — the TOPOA735A12 part comes from the board serial
number. Use ls /dev/cu.usbmodem* to see what appeared after connecting the cable.
To exit picocom when you are done: Ctrl-A, then Ctrl-X. Set your terminal size
to 242×61 for proper display — especially relevant during the OOBE wizard later.
Two notes from hard experience:
/dev/cu.debug-consoledoes not work for any stage. Ignore it.screenhas reliability issues with these devices. Usepicocom.
Step 4: Boot from USB and Flash to NVMe
- Insert the USB stick into one of the USB-A ports on the I/O side of the Thor
- Power on (press the power button)
- In Tab 1 (B4): press Enter at the pre-boot prompt, wait for the GRUB menu
- In the GRUB menu, select: “Flash Jetson AGX Thor Developer Kit on NVMe r38.4.0”
The GRUB menu also offers a “USB” flash target — do not use that. It installs onto the USB stick itself, not the internal NVMe SSD.
After you confirm the selection, switch to Tab 2 (B2). The kernel will print boot messages
for a minute, then go silent. That silence lasts about 10 minutes. This is the actual
installation. The installer output goes to ttyUTC0 (a hardware UART, not accessible from
the USB serial ports), so there is nothing to watch. This is normal. Do not power-cycle.
Installation is complete when Tab 2 shows:
[   12.260117] nvidia-modeset: WARNING: HW supports 8 heads. Limiting to 4 heads
[   12.260117] Please complete NVIDIA OOBE on the serial port provided by Jetson's USB device mode connection. e.g.
  /dev/ttyACMx where x can 0, 1, 2 etc.
Note the ttyACMx hint in the message — that is a Linux device path. On macOS there is no
ttyACM. Ignore that hint. The correct macOS device appears after the cable swap below.
Remove the USB stick. Do not power off yet.
Step 5: The OOBE Trap
This is the part that caught us. The message above says to complete OOBE on “the serial port provided by Jetson’s USB device mode connection.” On the Debug-USB port (the one behind the lid), the OOBE wizard does not appear. Nothing shows. You wait. Still nothing.
This is a known JetPack 7.0 limitation. NVIDIA has acknowledged it on the developer forum (thread here) with a fix targeted for 7.1. The workaround:
- Disconnect the USB-C cable from the Debug-USB port (behind the lid)
- Reconnect the same cable to the USB-C port 5b on the I/O side (the middle USB-C port, next to the two USB-A ports)
- A new tty device appears on macOS. It keeps the same board-serial prefix as the Debug-USB
devices but with a different suffix — on our board it was B6:
ls /dev/tty.usbmodem* # find the new device picocom -b 115200 /dev/tty.usbmodemTOPOA735A12B6 - The OOBE wizard appears in text mode
Step through the wizard:
- Accept the EULA
- Create a user account
- Set the hostname
- Configure network — select
enP2p1s0for the RJ45 Ethernet - Set timezone
After completing OOBE the device reboots into a fresh Ubuntu 24.04.3 system.
Step 6: SSH Setup
Once the device is on the network, set up key-based SSH from macOS so you never need the serial console again.
# Generate a dedicated key
ssh-keygen -t ed25519 -f ~/.ssh/thor-04 -N "" -C "jonnyzzz@thor-04"

# Upload the key (first time needs the password)
expect <<'EXPECT'
set pub [exec cat ~/.ssh/thor-04.pub]
spawn ssh -o StrictHostKeyChecking=no -o PubkeyAuthentication=no jetbrains@thor-04 \
  "mkdir -p ~/.ssh && echo '$pub' >> ~/.ssh/authorized_keys && chmod 700 ~/.ssh && chmod 600 ~/.ssh/authorized_keys"
expect "*assword*"
send "jetbrains\r"
expect eof
EXPECT
Add to ~/.ssh/config:
Host thor-04 thor-04.local
    HostName thor-04
    User jetbrains
    IdentityFile ~/.ssh/thor-04
    IdentitiesOnly yes
Test it: ssh thor-04 should land you at a Linux thor-04 6.8.12-tegra aarch64 prompt
without a password.
Step 7: Post-Install Configuration
With SSH working, the rest is straightforward over the network:
Passwordless sudo:
ssh thor-04
sudo usermod -aG sudo jetbrains
echo "jetbrains ALL=(ALL) NOPASSWD: ALL" | sudo tee /etc/sudoers.d/jetbrains
Basic tools:
sudo apt-get install -y curl mc vim
Tailscale (if you want the device on your VPN):
curl -fsSL https://tailscale.com/install.sh | sh
Docker:
sudo apt-get update && sudo apt-get install -y docker.io
sudo usermod -aG docker jetbrains
sudo systemctl enable docker && sudo systemctl restart docker
After a logout/login cycle, docker ps works without sudo. We got Docker 29.1.3.
UEFI and ISO Compatibility
One more thing worth knowing before you try to reinstall later. There is a UEFI version dependency between the ISO revision and the firmware on the board:
| UEFI Version | ISO r38.2 | ISO r38.4 | Notes |
|---|---|---|---|
| r38.0.0 (factory) | Yes | Yes | No settings change needed |
| r38.2.x | Yes | Yes | Enable Display Handoff mode before USB |
| r38.4.x | No | Yes | Cannot downgrade to an older ISO |
If you flashed once with r38.4.x and want to reinstall: you must use the r38.4 ISO. Downgrading the UEFI is not supported.
For reinstalls with UEFI r38.2.x, before inserting the USB stick, go into: UEFI → Device Manager → NVIDIA Configuration → Boot Configuration → SOC Display Hand-Off Mode → “Auto”, Method → “efifb”.
What Came Out the Other Side
After following this path, the Thor is running:
- Ubuntu 24.04.3 LTS, kernel 6.8.12-tegra
- CUDA 13.0, NVIDIA driver 580.00
- Docker 29.1.3
- Tailscale, SSH key auth, passwordless sudo
The device is now a GPU node on our local network. Next: run inference workloads on it. The Jetson AGX Thor with its NVIDIA Thor GPU and unified memory is a different beast from the DGX Spark we covered in earlier posts — smaller footprint, ARM architecture, different memory model. The setup experience surfaced a few quirks specific to JetPack 7.0 that we have not seen documented well elsewhere.
If you run into the OOBE freeze, check the USB-C port. That one confused us for a while.